SuperCollider IDE is a new cross-platform coding environment, developed specifically for SuperCollider and introduced in version 3.6.
It is easy to start using, handy to work with, and sprinkled with powerful features for experienced SuperCollider coders. It is also very customizable.
It runs equally well and looks almost the same on macOS, Linux and Windows 7. (Issues with Windows XP remain to be solved.)
Overview
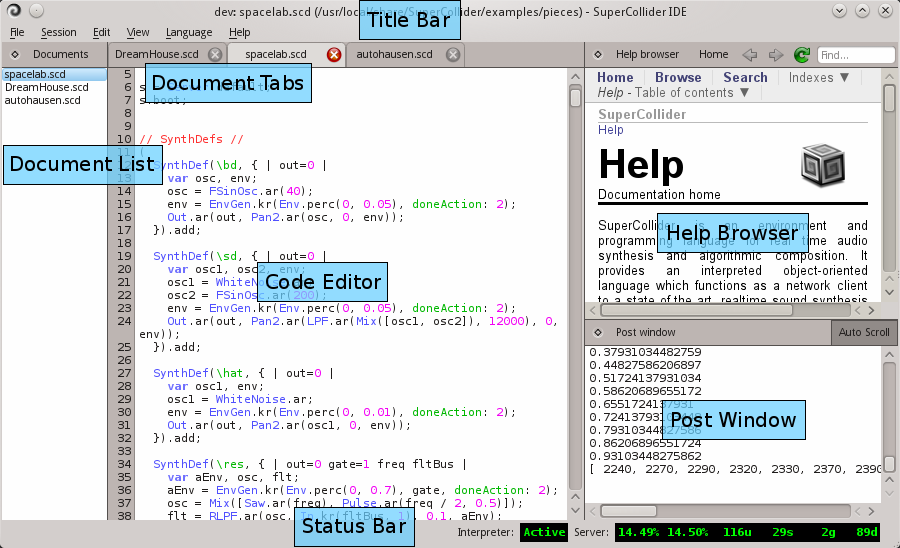
Here is an annotated screenshot describing various components of the IDE. Click here for a natural-size version.
Central components
- Title Bar
- Displays the current session name (see Sessions), and the filename of the current document.
- Code Editor
- The editor takes the central place. Here is where you will spend most of your time, writing code. Read more in the Code editor section.
- Document Tabs
- Above the editor, there is a series of tabs, one for each open document. Clicking on a tab will display the related document in the editor. The tabs can be drag-and-dropped to change their order.
- Tool Panel
- This is where various tools related to code editing are displayed. The panel is initially hidden, and is only displayed when one of the tools is activated. You can activate each of the available tools via the menu View > Tool Panels, as well as using keyboard shortcuts. This the list of tools:
- Find (Ctrl+F) - Find text in the current document.
- Replace (Ctrl+R) - Find and replace text in the current document.
- Go-to-line (Ctrl+L) - Jump to a particular line of the current document by number.
- Command Line (Ctrl+E) - Write and evaluate single lines of code, as in a terminal.
- Status Bar
- Contains status information about the interpreter and the sound server. Also displays any occasional notifications related to the IDE.
Docklets
Around the central area described above, there are dock areas where various other panels called docklets are displayed. They are named so, because they can be moved around to different positions in the dock areas, or even be undocked to float above the main window, and they may also be hidden. You can show or hide each of the available docklets via the menu View > Docklets.
Here is a list of available docklets:
- Help Browser
- Displays and navigates through help pages.
- Post Window
- Displays the response of the interpreter: results of code evaluation and various notifications, warnings, errors, etc...
- Documents List
- A list of open documents; when you have a lot of them, this may be more handy than the Document tabs.
The docklets may be moved to different areas by drag-and-dropping them by their own title bar. There are four dock areas, along each of the edges of the screen: left, right, top and bottom. .
The docklets may be in four different states:
- Docked - You can drag-and-drop docklets into each dock area either side by side or on top of each other. In the latter case, small tabs will appear that allow you to switch the visible docklet in a particular area. Some docklets are restricted so they can only be placed into some of the areas.
- Undocked - By dropping a docklet outside of any dock area it will stay separate and always on top of the main window. You can also undock it using the menu accessible by clicking in the top-left corner of a docklet.
- Detached - Using the menu accessible by clicking in the top-left corner of a docklet, you can detach it. A detached docklet behaves just like a normal window: it may be minimized and maximized, the main window may be raised in front of it, it will appear in the operating system task bar, etc.
- Hidden - A docklet may be hidden either using the menu accessible by clicking in the top-left corner of a docklet, closing a detached docklet's window, or using the main window menu View > Docklets. To show a hidden docklet, use the same main window menu.
Getting help
All the help options are accessible via the main menu under Help.
The keyboard shortcut Ctrl+D (as in Documentation) is the most handy way to get help. It will navigate the Help Browser to a help page related to the text around the cursor:
- If the cursor is at a class or a method name, its documentation will be displayed.
- If there is no class or method matching the text at the cursor, the help search results will be displayed for the text.
- In any case, the Help Browser will be shown, if it was hidden.
The Ctrl+D shortcut works in various places in the IDE: the Editor, the Command Line, the Post Window, or the Help Browser itself. It will always use the text around the cursor or the selected text (if any) to search for help.
If you want to go directly to a specific help page, use the Ctrl+Shift+D shortcut which will pop up a box where you can type a name of a class or a method, or any text, and hit Return to get related help.
In the title bar of the Help Browser there are controls to navigate to the help home page, or backwards and forwards in history, as well as to reload the current page.
Using the Ctrl+F shortcut while the Help Browser is focused, you are sent directly to the Find field, which you can use to search for text in the current help page.
Starting up the system
There is no SuperCollider fun without two crucial components:
- The language interpreter
- ...is what interprets and executes your SuperCollider code. It is started automatically when the IDE starts. However, it is actually separate from the IDE, so it can be stopped and restarted at your will using the Language menu. When the interpreter is running, the box in the Status Bar labelled "Interpreter" will display "Active" in green letters.
- The audio server
- ...is what makes your SuperCollider code sound. Without the audio server running, you can run SuperCollider code, but it will not make any sound. Unlike the interpreter, the audio server is not started automatically. To start it, use the quick Ctrl+B shortcut, or the Language menu. Note that the language interpreter must already be running in order to start the audio server. When the audio server is running, the box in the Status Bar labelled "Server" will display the status in green numbers.
Of course, once the interpreter and the audio server are running, the most fun part of it all is evaluating code. Use the Ctrl+Return shortcut to evaluate the current line, region, or selection. See Evaluating code for more information.
When you want to stop the running code, use the Ctrl+. shortcut (Ctrl+Period). See more on this at the end of the Evaluating code section.
Most of the time, there is no need for restarting the interpreter. However, this becomes very useful if you accidentally evaluate code that goes into an infinite loop without a pause, or if the interpreter simply crashes and stops by itself. In that case, use the Language menu to restart the interpreter.
When your class library changes, either because you have installed or removed a Quark, or just modified a class file, you will need to recompile the class library in order for changes to take effect. You can do that quickly via the Ctrl+Shift+L shortcut, or via the Language menu.
Code editor
Evaluating code
To evaluate code, use one of the following keyboard commands:
- Ctrl+Return
- Most used, "smart" code evaluation:
- Normally, the current line will be evaluated (where the cursor is).
- If the cursor is within a region, the entire region will be evaluated. See below for explanation of regions.
- If some code is selected, the selection will be evaluated.
- Shift+Return
- Evaluates either the current line, or the selection (if any). Use this to evaluate a single line within a region without the need to select it.
Regions make it quick and easy to evaluate larger portions of code. A region is surrounded by parentheses; to be interpreted as a region, the parenthesis must each be the only character on a line.
If the cursor is anywhere between the outermost parentheses, pressing Ctrl+Return will automatically evaluate the entire contents within the parentheses, starting with Pbind and ending with play;.
To quickly evaluate a portion of code, you can also double-click on any bracket (round, squared, or curly), which will select everything between this and the other matching bracket, so you can quickly evaluate it.
To stop any running code, use the Ctrl+. shortcut (Ctrl+Period). This will stop all the code scheduled on the clocks, as well as all the sound processes on the audio server.
Automatic indentation
The editor helps you by automatically indenting lines according to opening and closing brackets as you type. With every new line, the indentation will be increased if there is an opening bracket on the previous line. As you continue to type closing brackets, the indentation will decrease to align with the matching opening brackets.
If the indentation of a portion of code is messed up, you can select it and press Tab to automatically indent it according to surrounding brackets. This also works without selection for the current line.
You can manually insert a level of indentation anywhere in code by pressing Shift+Tab.
The indentation can either use tab characters or spaces, which you can quickly toggle via the main menu option Edit > Use Spaces for Indentation. More indentation options are available in the IDE preferences dialog.
Automatic completion
As you type, the editor will try to find possible continuations of your code, and pop up a list of suggestions, so you can quickly insert one instead of typing the whole text. This is called autocompletion and is a great aid towards writing code faster and with less errors.
In general, this works for class and method names. These are the things that the editor can autocomplete:
- Class names
When you have typed at least 3 letters of a class name, a list of classes beginning with these letters will be shown.
- Method names following class names
When you type a dot after a class name, a list of methods of that class will be shown.
- Method names following literals and built-ins
When you type a dot after a literal (number, string, symbol, etc.) or a built-in (currentEnvironment, thisProcess, etc.), a list of instance methods of their classes will be shown.
- Method names following a variable name
When you type a dot and 3 letters after a variable, a list of all methods of all classes starting with these letters will be shown (because the class of the variable is not known).
Once the autocompletion menu pops up, you can use the arrow keys or Page Up and Page Down to select an entry, and press Return to insert it into your code. If you continue typing, the list of options will be further filtered to match the typed text.
Note that the autocompletion menu disappears when the typed text exactly matches one of autocompletion options. This is intended as help: the menu tries to get out of your way when you probably don't need it.
If the autocompletion menu is not shown, you can show it using Ctrl+Space, as long as there is any autocompletion options available. You can always dismiss the menu by pressing Escape.
Method call assistance
The editor helps you when writing arguments of a method by showing you a complete list of the method's arguments and their default values, as long as it manages to figure out exactly which method that is. This is called method call assistance. It helps you to know exactly which argument you are typing, and reduces the need to look into documentation.
The assistance is activated as soon as you type an opening parenthesis after a method name, at which point a box containing the arguments will pop up. However, if the class of the method is not known, first a menu of classes that implement the method will be shown, and after you select one of the classes using the arrow keys or the Page Up and Page Down keys, and press Return, the box with arguments will pop up.
So, for example, in the following cases method call assistance will pop up immediately:
...while in the following cases, you will first need to select a class, because the class is not known:
If method call assistance is not shown, you can activate it using Ctrl+Shift+Space with the cursor between parenthesis surrounding the arguments. You can always dismiss it by pressing Escape.
Tool panels
All tool panels are listed and may be activated via the main menu View > Tool Panels. To close the currently displayed panel, press Escape.
Find and Replace
Shortcuts: Find: Ctrl+F / Replace: Ctrl+R
The Find panel is used to find text in the currently open document. As soon as you start typing into the Find field, the entered text is searched for, and the results are highlighted. The first found result is also selected. By pressing Return, you can jump through all the result.
Notice how the Status Bar reports the number of search results, whenever the search text is changed.
If you invoke the Find shortcut with some text selected in the code editor, the Find field will be filled with the selection.
The Replace panel is an extension to the Find panel: it adds another field where you can enter text to replace the search results with. By pressing Return in the Replace field, the current search result will be replaced and the next result will be selected.
Use the Replace All button to replace all search results. Notice how the Status Bar reports the number of replacements.
You can access more search options by clicking on the button in the top-right corner of the Find/Replace panel. The options are:
- Match Case - make the search case-sensitive.
- Regular Expression - treat the search text as a regular expression. More on this below.
- Whole Words - only search for whole words; i.e. the characters on the left and the right side of a search result must not be letters or numbers.
Regular expressions are a powerful way to search for text that matches a pattern, instead of an exact sequence of characters. When this option is enabled, replacement supports backreferences, i.e. reusing portions of the found pattern in the replacement text.
We will not go here into details about regular expression. To learn more, we would like to refer you to an excellent tutorial online: http://www.regular-expressions.info/quickstart.html
Go-To-Line
Shortcut: Ctrl+L
Using the Go-To-Line tool, you can quickly jump to a line in the current document, by number. Just enter the line number and press Return.
Comand Line
Shortcut: Ctrl+E
Sometimes, you need to evaluate a temporary expression that does not need to be saved into a document. The Command Line offers a one-line text field where you can enter a SuperCollider expression, and press Return to evaluate it.
Use the Up and Down arrow keys to navigate through the history of evaluated expressions. Up will move to older expressions, and Down will move back to more recent ones.
Class library navigation
Often it is very useful to be able to jump directly to a place in a file, where a particular class or method is implemented, or to find all the places where a class or a method name is used. The IDE offers practical ways to achieve that.
Look up implementations
The Ctrl+I shortcut with the text cursor at a method or a class name will open a dialog with a list of places where that method or class is implemented. By selecting one of the entries and pressing Return, the IDE will open the file and position the text cursor at the location you are looking for.
Note that the Ctrl+I shortcut works in various places in the IDE, wherever there may be code: the Editor, the Command Line, the Post Window, or the Help Browser. It will always use the text around the cursor or the selected text (if any) to look for a method or a class with a matching name.
The list in the dialog is formed as follows:
- If you are looking up a class name, the class and all its methods including those of its superclasses will be listed.
- If you are looking up a method name, all the methods of all classes with that name will be listed.
- If there is no class or method that matches the name exactly, partial matches will be displayed
You can use the text field at the top of the dialog to search for a method or a class directly. Just type in some text and press Return.
The Ctrl+Shift+I shortcut will open the dialog empty, regardless of position of the text cursor.
Look up references
The Ctrl+U shortcut will open a dialog similar to the one described above, except that it will list places where a method or a class with a particular name is used. Note that this only searches class files in the class library, not regular code files.
Just as the Ctrl+I shortcut described above, Ctrl+U will work at any place in the IDE where there may be code.
The Ctrl+Shift+U shortcut will open the dialog empty, regardless of position of the text cursor.
Sessions
Sessions preserve the state of the IDE at the time of quitting, so next time you use it you can resume with the same arrangement of open documents and docklets automatically.
To save the current state as a new session, use the "Session > Save Session As..." menu action. You will be prompted to enter a name for the new session.
To open a saved session, use the "Session > Open Session..." menu, which contains all the saved sessions.
To start a new unsaved session, use the "Session > New Session" menu action.
You can quickly switch the active session via a pop-up list of all sessions using the Ctrl+Shift+Q shortcut.
More options, including removing a saved session, are available in a session management dialog accessible via "Session > Manage Sessions..." menu action.
By default, the IDE starts with the last session used before closing, but you can change this behavior in the IDE configuration dialog.
Various handy shortcuts
- Focus Post Window: Ctrl+P
- Gives focus to the Post Window. Then you can use arrow keys and Page Up / Page Down to scroll through output from the interpreter. Press Tab to return to the Code Editor.
- Clear Post Window: Ctrl+Shift+P
- Clears the Post Window contents.
- Enlarge/Shrink Font: Ctrl++ / Ctrl+-
- Enlarges or shrinks font in Code Editor, Post Window, or Help Browser.
Customization
Many customization options are available in the IDE configuration dialog, accessible via "Edit > Preferences" menu action.
The options include: fonts, code colors, keyboard shortcuts,...
(More to write later)